Chapter 2 Edge Impulse 語音關鍵字偵測範例
本文是用 Arduino Nano 33 BLE Sense 實現 Edge Impulse 的 TinyML 語音關鍵字偵測範例
- 參考 Edge Impulse 文件 Edge Impulse - Docs - Arduino Nano 33
- 需要在 Edge Impulse Studio 註冊建立帳號 我的 Edge Impulse project - Edge Impulse Studio, 需要記住註冊的 email 位址跟密碼
2.1 Installing dependencies 安裝套件
在 Arduino Nano 33 上執行 Edge Impulse, 需要安裝以下軟體: (我使用的 Ubuntu 18.04 當開發環境, 在 Windows 10 的 VMWare Player 下執行)
2.1.1 安裝 Edge Impulse CLI
安裝 Python 3
安裝 Node.js v14 或更新版
$ curl -sL https://deb.nodesource.com/setup_14.x | sudo -E bash -
$ sudo apt-get install -y nodejs
$ node -v    # 確定 node 的版本是否 v14 以上
$ mkdir ~/.npm-global
$ npm config set prefix '~/.npm-global'
$ echo 'export PATH=~/.npm-global/bin:$PATH' >> ~/.profile
$ source ~/.profile- 安裝 Edge Impulse 的 CLI
$ npm install -g edge-impulse-cli
$- 安裝 edge-impulse-cli 後, 它有 7 個工具包, 我們只會用到(紅字圈選的) 2 個
- edge-impulse-daemon - configures devices over serial, and acts as a proxy for devices that do not have an IP connection.
- edge-impulse-uploader - allows uploading and signing local files.
- edge-impulse-data-forwarder - a very easy way to collect data from any device over a serial connection, and forward the data to Edge Impulse.
- edge-impulse-run-impulse - show the impulse running on your device.
- edge-impulse-blocks - create organizational transformation blocks.
- eta-flash-tool - to flash the Eta Compute ECM3532 AI Sensor.
- himax-flash-tool - to flash the Himax WE-I Plus.
2.1.3 安裝 GNU Screen:
$ sudo apt install screen.
$
2.2 Arduino Nano 33 連接上 Edge Impulse
2.2.1 透過 USB 將 Nano 33 連上電腦
也許需要連按 RESET button 兩次, 來更新 Arduino Nano 33 BLE 的 bootloader. RESET 按鍵位於靠近 Nano 33 板子位於 Micro USB 接頭的後方白色按鈕. 連按 2 次後, 除了原有的 Micro USB 左邊的綠色 LED 會亮外, 右邊的橙色 LED 會慢閃.
2.2.2 更新韌體 (firmware)
- 下載 Download the latest Edge Impulse firmware, 並解壓縮
- 打開解壓縮後的目錄
- 裡面包含 Edge Impulse 提供的 Nano 33 firmware外, 還包含上傳程式, 有 Windows, Linux, MacOS 三個版本都有
- Windows:
C:\Users\marconi\Downloads\EdgeImpulse> flash_windows.bat- MacOS:
$ ./flash_mac.command- Linux:
$ ./flash_linux.sh
- 執行上傳程式後, 再按一次 (不是 2 次) RESET button, 開始執行 Nano 33 新的 firmware
2.2.3 將 Nano 33 (透過 USB 連上電腦) 連接上 Edge Impulse 網頁
到 Terminal (MacOS 或 Linux) 下執行以下指令, 此時, 電腦會要求輸入你在 Edge Impulse 註冊的 email 位址及密碼 (如果還沒有註冊, 就先到 我的 Edge Impulse project - Edge Impulse Studio 上註冊)
$ edge-impulse-daemon
# 如果需要改用不同的 Edge Impulse 用戶, 需要加 --clean 選項
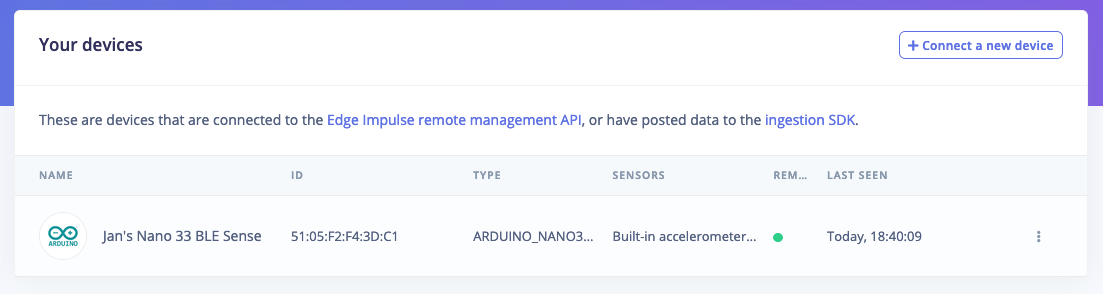
$ edge-impulse-daemon --clean2.2.4 到 Edge Impulse 網頁確認連結成功
到 我的 Edge Impulse project - Edge Impulse Studio, 在左邊的選單選取 “Devices” 查看是否有 Nano 33 這個裝置, 而且燈號亮綠燈, 如果是亮紅燈, 表示連接有問題. 再回頭到 Terminal 看 edge-impulse-daemon 是否正確執行
2.3 到 Edge Impulse Studio 網頁做訓練
Edge Impulse 網頁 - 語音辨識 說明的蠻清楚
訓練的結果還不錯, 但 validation 的結果就不是太好, 留待後續改善的空間
訓練結果

測試結果

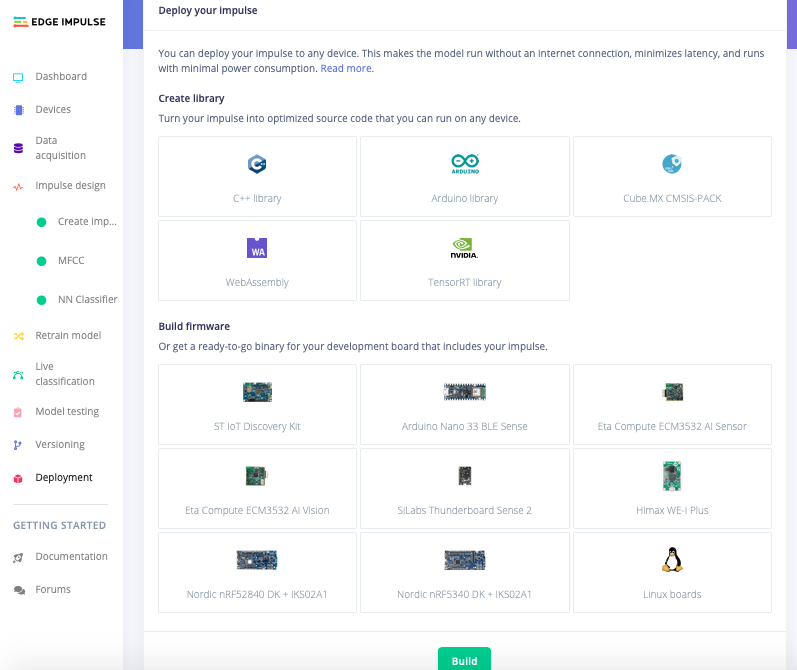
到了最後的 build 時, 可以選擇 Arduino Library 再到 Arduino IDE 去執行, 或是直接選擇 Arduino Nano 33 BLE Sense 用電腦來控制執行, 留待下一章節再說
2.4 到 Arduino IDE 下載程式到 Nano 33 BLE Sense 執行語音關鍵字偵測
Edge Impulse 到了最後的 build 時, 可以選擇 Arduino library 再到 Arduino IDE 去執行, 或是選擇 Arduino Nano 33 BLE Sense 用電腦來控制執行, 後者作法較為簡單, 我們先介紹
2.4.1 Build 時, 選擇 Arduino Nano 33 BLE Sense 用電腦來控制
選擇 Arduino Nano 33 BLE Sense 作 Build 後, 網頁在 build model 完成後, 會要求下載一個 zip 檔案, 下載完成, 解壓縮後, 會有 4 個檔案, 執行 flash_linux.sh, 將 firmware 更新到 Nano 33 上, 再執行 edge-impulse-run-impulse 即可以 Edge Impulse 在 Nano 33 上的語音關鍵字偵測.
$
$ ls
firmware.ino.bin  flash_linux.sh   flash_mac.command  flash_windows.bat
$ ./flash_linux.sh
FInding Arduino Mbed core...
Finding Arduino Mbed OK
Finding Arduino Nano 33 BLE...
Finding Arduino Nano 33 BLE OK

...

[=======================] 100% (77/77 pages)
Done in 12.201 seconds

Flashed your Arduino Nano 33 BLE development board.
To set up your development with Edge Impulse, run 'edge-impulse-deamon'
To run your impulse on your development board, run 'edge-impulse-run-impulse'
$ edge-impulse-run-impulse
2.4.2 Build 時, 選擇 Arduino Libiary, 用 Arduino IDE 來執行
- 選擇 Arduino library 作 Build 後, 網頁在 build model 完成後, 會要求下載一個 zip 檔案, 下載完成, 但不要解壓縮. 下載完成時, 螢幕也提供接下來的作法
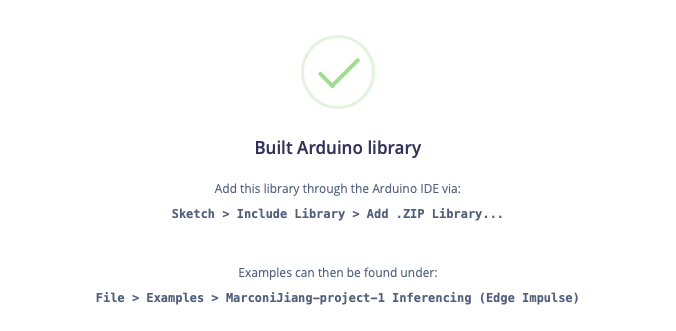
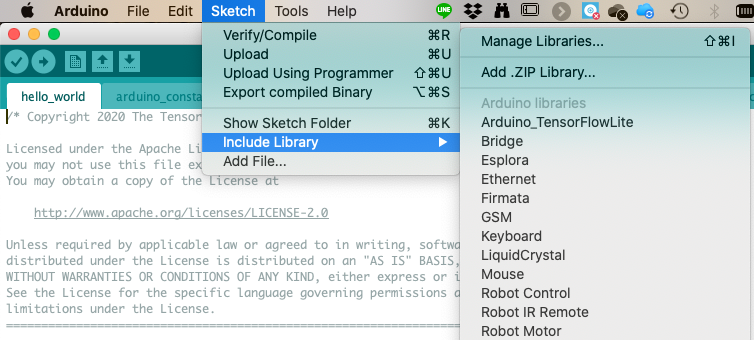
- 接下來, 開啟 Arduino IDE, 到 Sketch - include Library - Add .ZIP Library 去選取下載的檔案
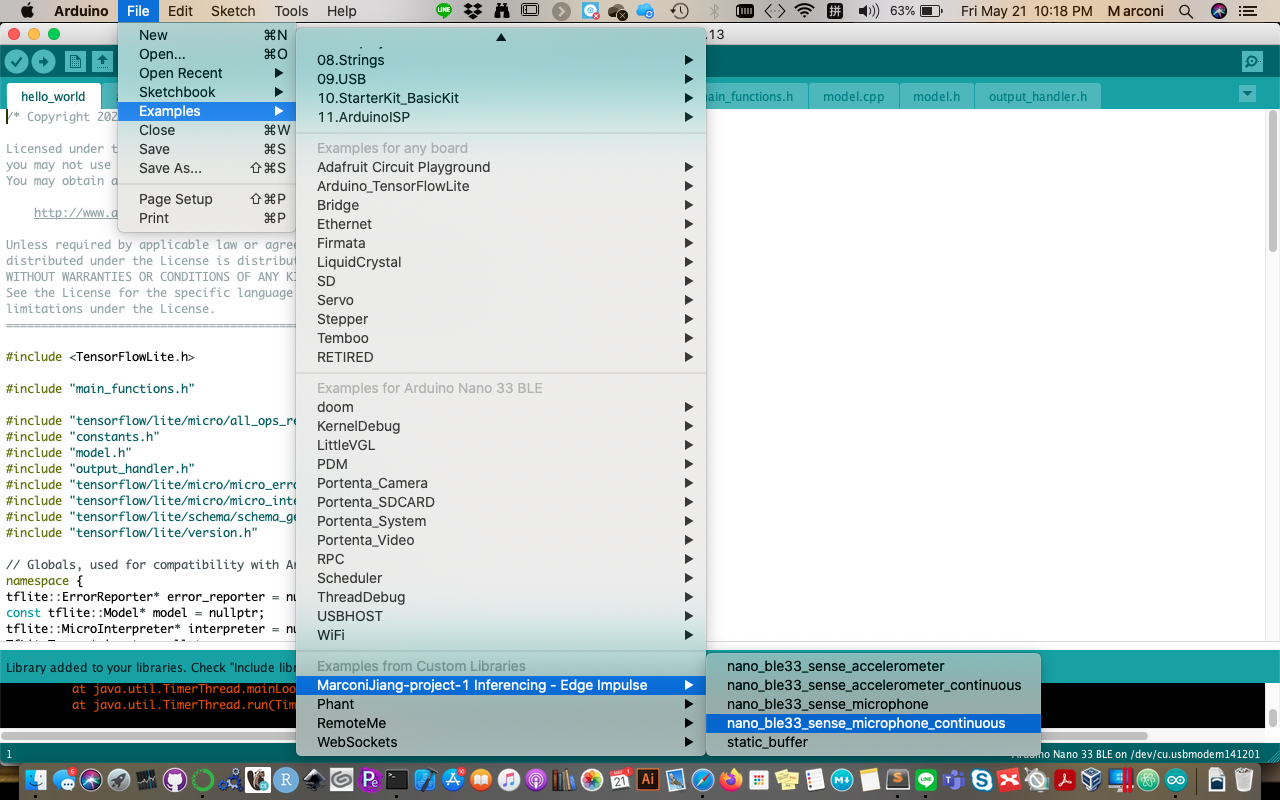
- 再到 File - Examples 的最下方選取 nano_ble33_sense_microphone 範例程式, 就可以執行語音關鍵字偵測
2.5 修改 Nano 33 BLE Sense 控制線路, 增加按鍵作為辨識的開始, 用板上 LED 表示狀態
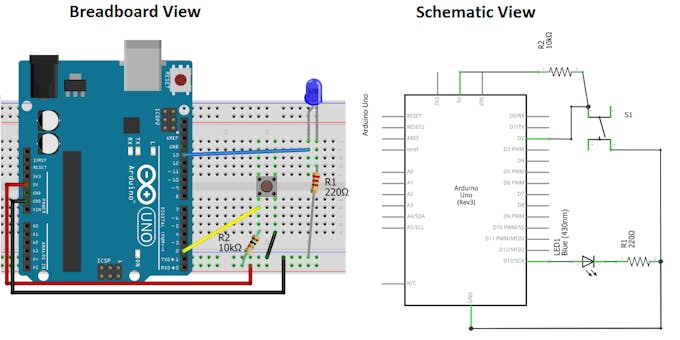
- Edge Impulse 的語音關鍵字偵測程式以無限循環的方式進行, 常常不知道何時開始辨識, 加上個按鍵來控制, 作為辨識的開始應該是個不錯的作法. 這在 Arduino 是個標準作法, 網路上都可以找得到, 只是需要注意這還是有幾種接法, 不同的接法, 程式的寫法也不同, 我用的是 pull-up 電阻的作法 (電子業界大多採取這種省電的作法), 因此, 當按鍵沒按時是 ‘1,’ 按下時是 ‘0.’
麵包板及線路圖
實作
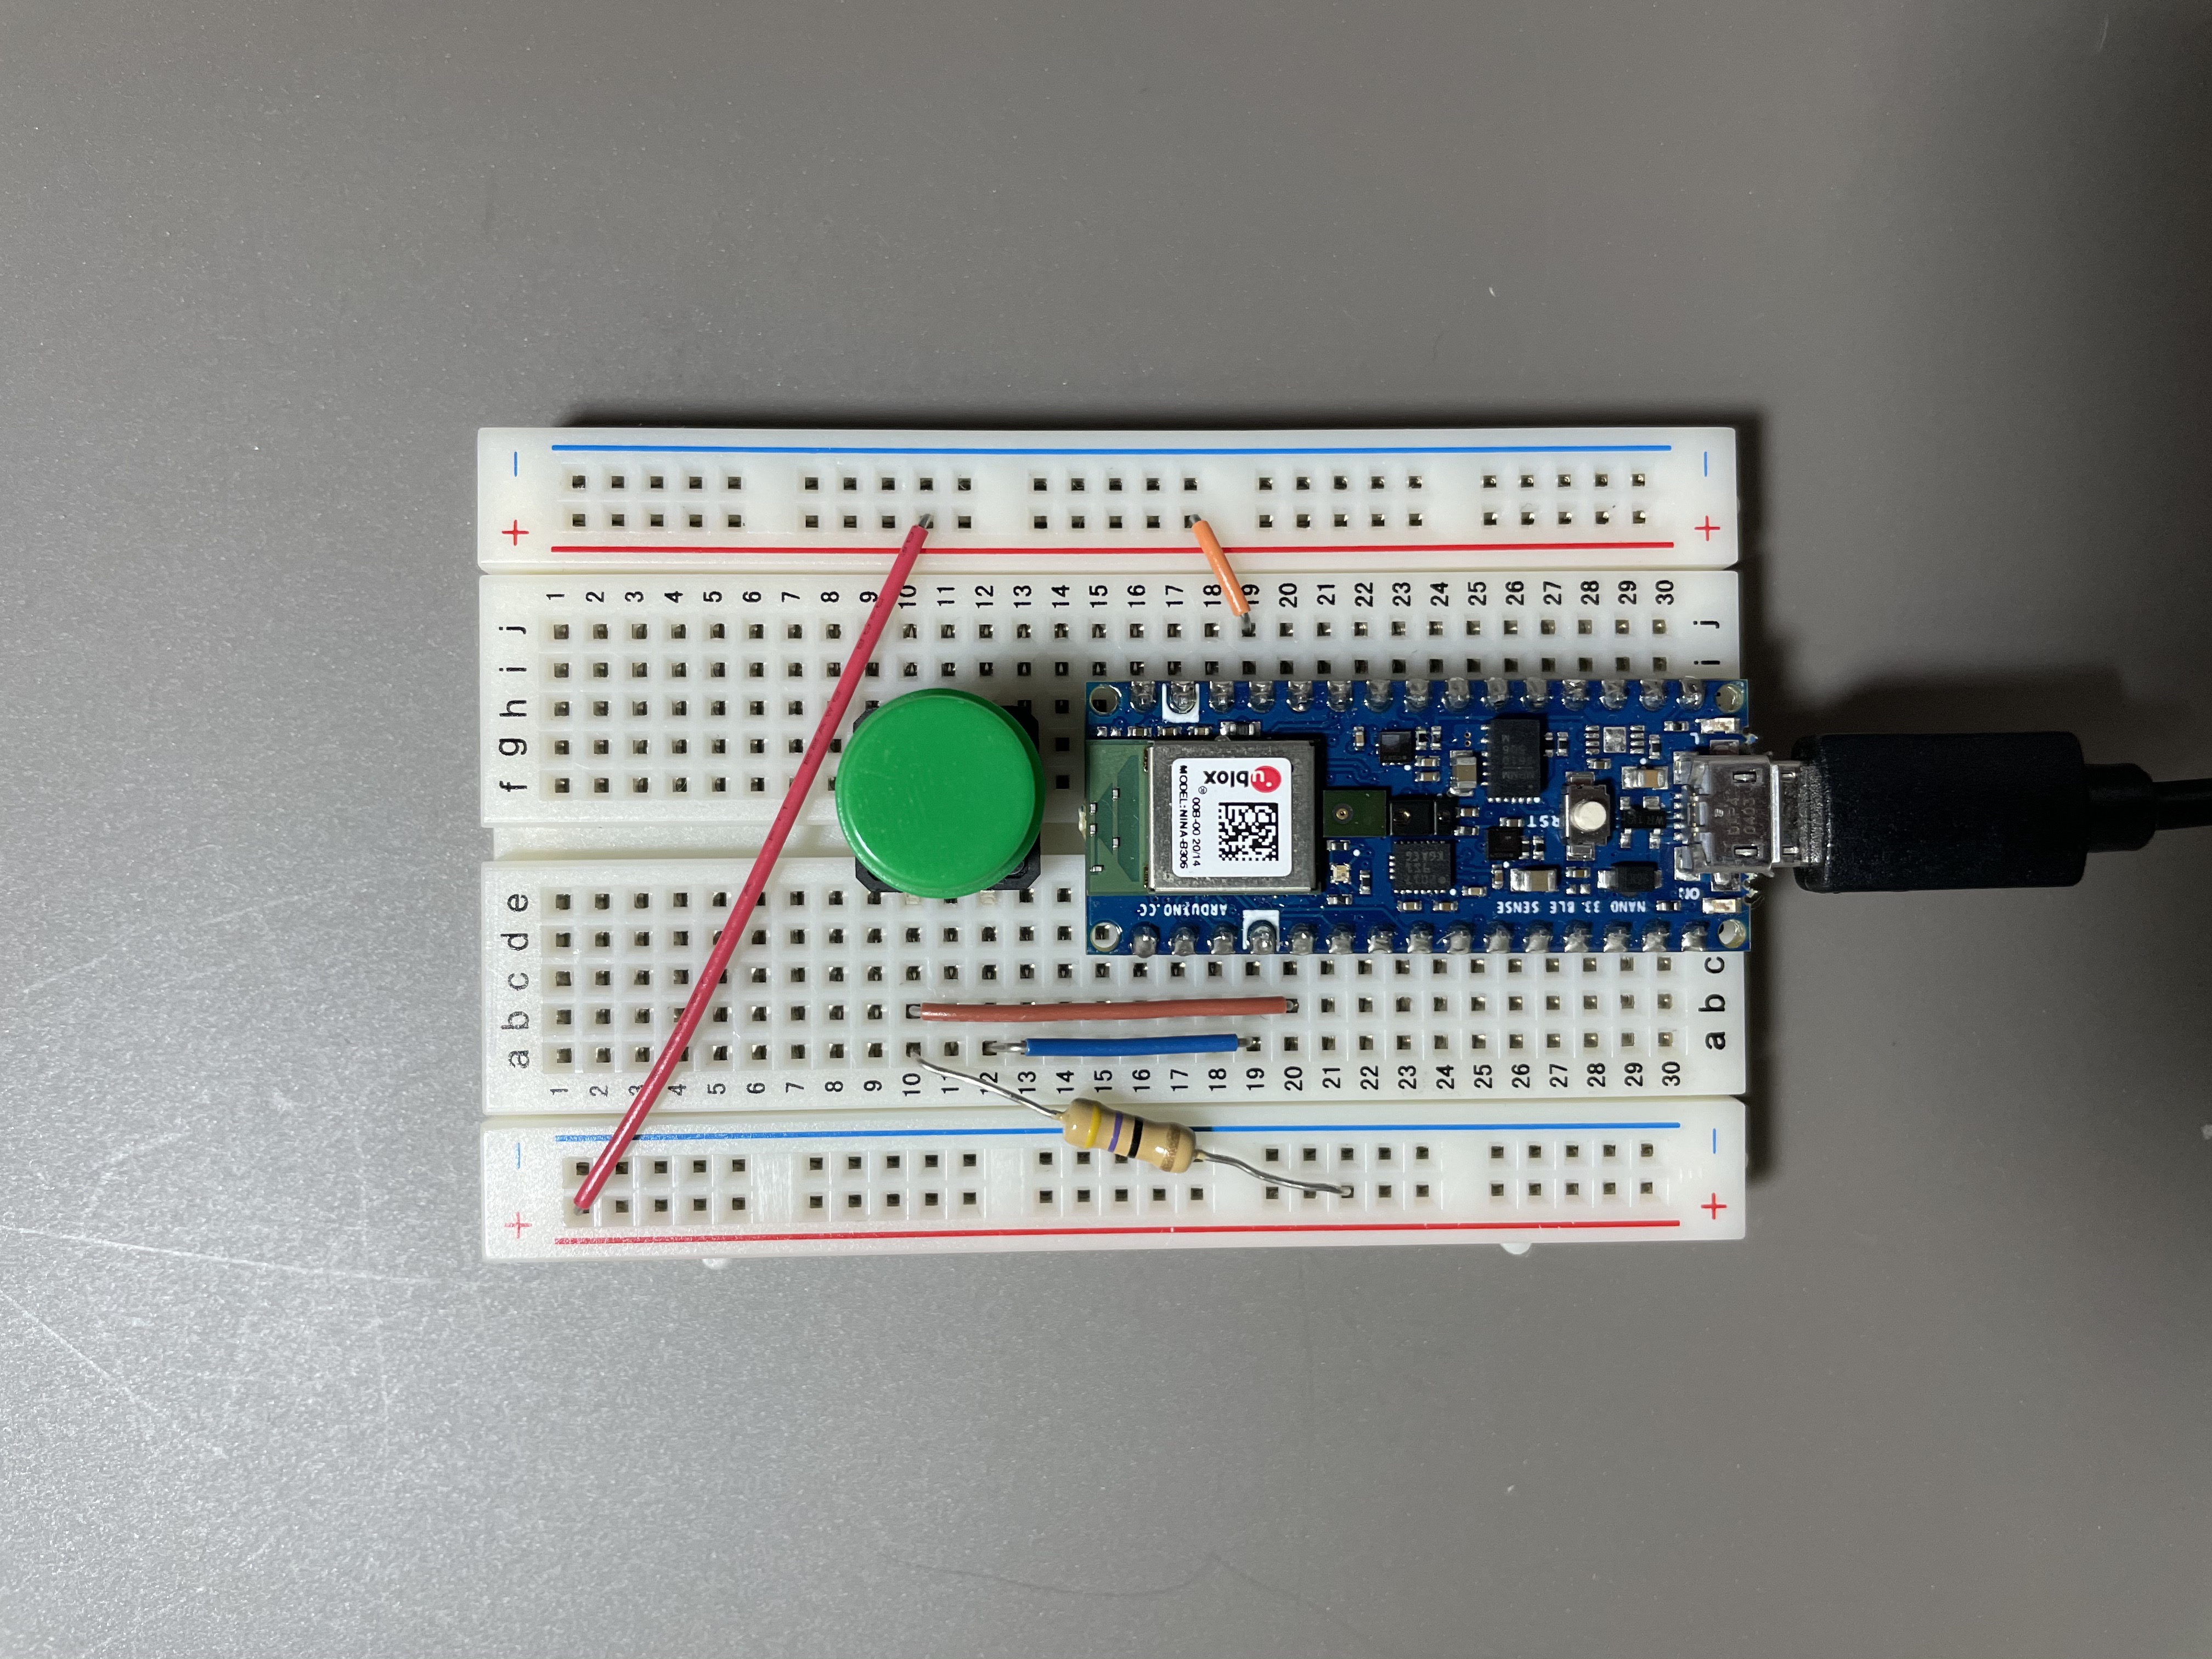
- Nano 33 BLE Sense 上有 3 個 LED (紅/綠/藍) 供使用者操作, 就利用這來表示目前程式的狀態
- 綠燈亮: 表示可以開始執行, 這時候, 按下按鍵就可以進行辨識
- 紅燈亮: 表示進行語音讀取, 儲存, 以及辨識進行中
- 藍燈亮: 我讓 Nano 每次執行完, 亮藍燈, 先暫停 3 秒, 結束後, 回到綠燈, 繼續執行
- 我的 Arduino 程式儲存在 github - Arduino Nano 33 BLE Sense with Edge Impulse Speech Recognition 用於辨識 4 個關鍵字
- ‘前進’ - label 是 ‘forward’
- ‘右’ - label 是 ‘Right’
- ‘左’ - label 是 ‘Left’
- ‘停’ - label 是 ’Stop’